Initially, we didn’t think about writing another part of this blog post series, and the way we wrapped up the second one could give that impression. However, recent updates have made this topic worth revisiting, so here we are.
Why we finally migrated to RayService
In the first blog post, we mainly talked about RayCluster and its Custom Resource Definition (CRD) managed by the KubeRay K8s Operator. We mentioned that a RayCluster created by its CRD starts in an idle state. As a result, it isn’t immediately ready to serve the requests heading to your application because the applications haven’t been deployed yet. We used to deploy them using the RayJob CRD managed by ArgoCD, but as mentioned in the previous blog posts, this approach has its drawbacks. To mitigate them, we adopted Argo Events and Argo Workflows (more in the first blog post). However, as said before, this wasn’t a silver bullet. We still experienced brief outages because it took some time (approximately 3 minutes) to redeploy the applications after a pod running a Ray head node restarted (for more information, see the first part). These small downtimes made the system appear unreliable, and we could no longer tolerate that because we aim to achieve a system with zero downtimes. Thus, even though we had previously decided against it (more in the second part), we had no other option but to migrate to the RayService CRD.
Managing deployments with serveConfigV2
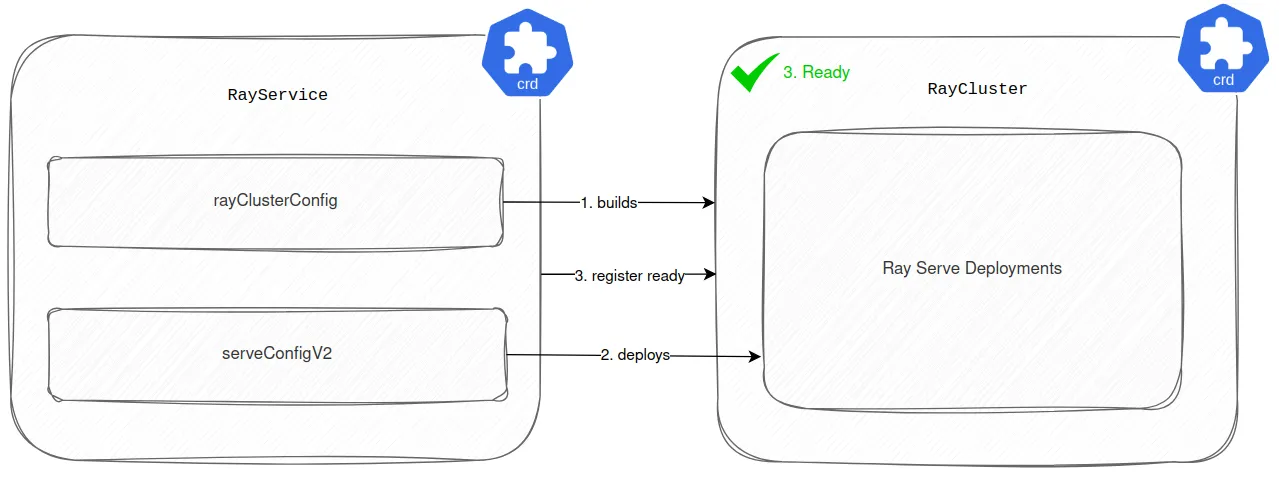
As a first step, we dropped the RayJob CRD and started managing all Ray Serve Deployments using the serveConfigV2 attribute in the RayService CRD. With this setup, the RayService firstly builds the RayCluster according to the rayClusterConfig attribute. Then it deploys the Ray Serve Deployments based on the configuration in serveConfigV2. Once all Ray Serve Deployments are healthy and running, RayService registers the newly built RayCluster as ready to serve the traffic. You can see this process in the diagram below.
Taming an unpredictable deployment process
At first, we encountered some difficulties when deploying Ray Serve Deployments using RayService instead of RayJob. The deployment process seemed quite unpredictable. Sometimes it succeeded without issues, while at other times, we ran into various errors. The error logs were about:
- Ray Actor failed due to missing too many heartbeats
- Ray Actor’s worker process died because of potential reasons:
- OOMKill
- ray stop –force call
- SIGSEGV call
- gRPC connection errors between the RayCluster’s nodes (pods)
- some other errors (literally written like that in the error message)
Eventually, we discovered that the problem was a lack of ready-to-serve Ray Worker nodes (pods), particularly those running the CPU-only applications. Increasing their initial number made the deployment process much more reliable and predictable.
Rolling updates done right with an external GCS
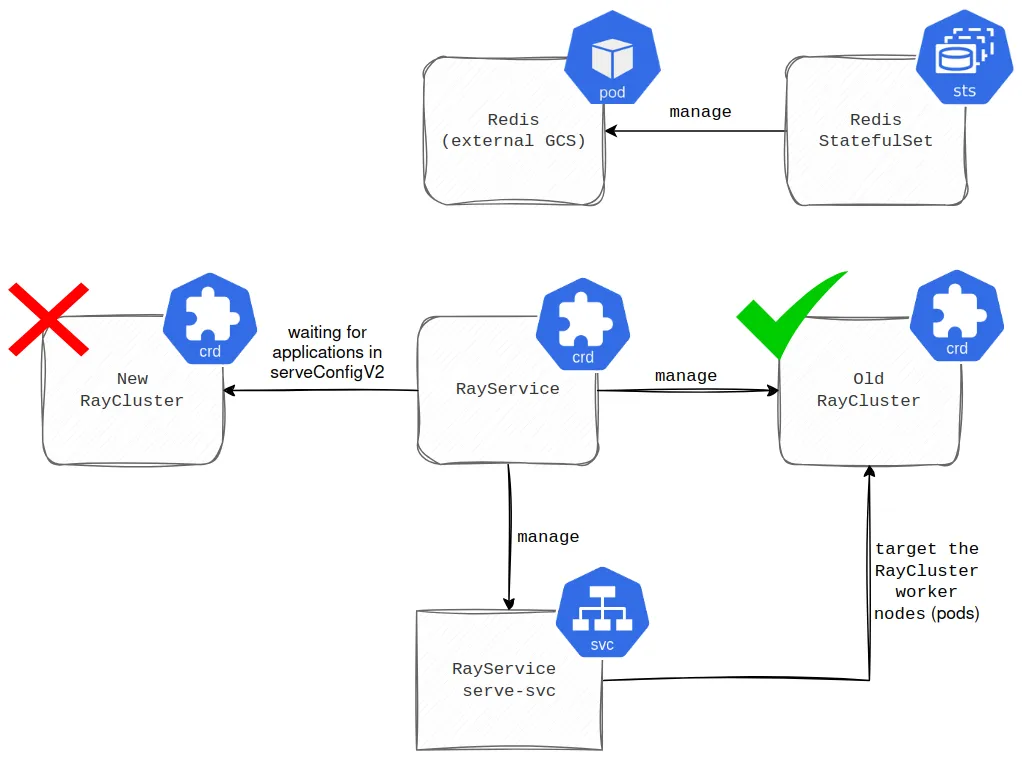
It’s worth highlighting that thanks to RayService, we successfully ran RayCluster with an external Global Control Store (GCS), avoiding the issues previously faced when updating the applications’ dependencies (more in the first part). The thing is, we used to install application dependencies leveraging the container’s args before starting the main process. Once you update the args, RayService performs a rolling update of RayCluster. This process works as follows. First, a new RayCluster is spawned (see the diagram below for a visual interpretation).
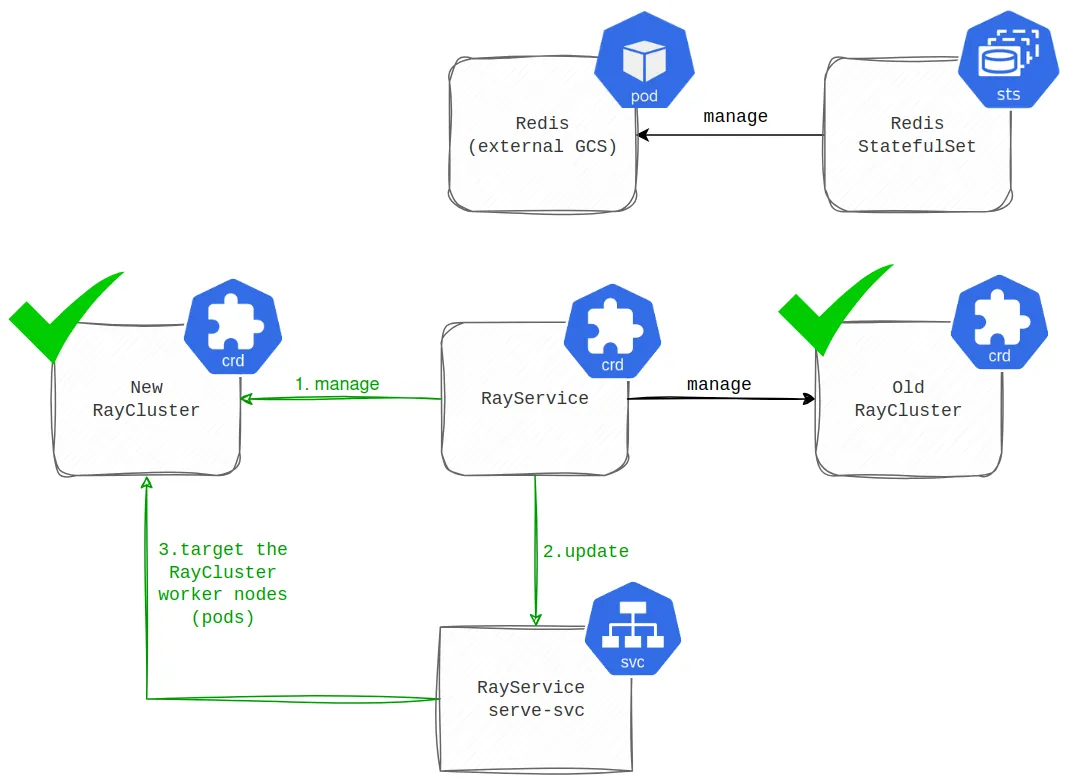
Then, when all the applications defined in the serveConfigV2 are healthy and running, the traffic that used to head to the old RayCluster is routed to the new one (illustrated in the diagram below).
Finally, the old RayCluster is decommissioned. However, before RayService takes down the old RayCluster, it spawns a pod to clean up its GCS state in Redis (shown in the diagram below).
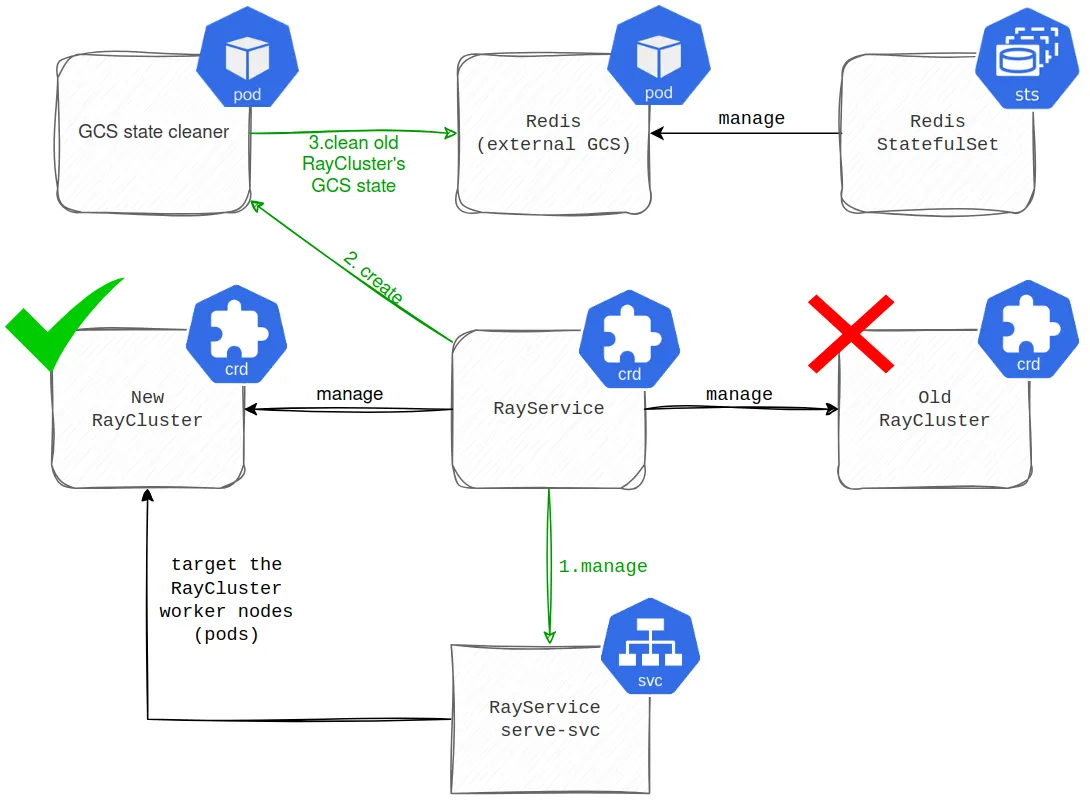
This cleanup pod doesn’t exist when working with the RayCluster CRD (more in the first part), which kinda makes sense since you aren’t decommissioning the RayCluster in this scenario, you are just updating its GCS state. In hindsight, we might have resolved this issue by using custom Docker images as we did after migrating to the RayService. Will cover that later, as we would like to outline more benefits that RayService brought first.
Why the team finally feels secure
Honestly, the team started feeling more secure ever since we migrated to the RayService CRD. The main factor is that we no longer have to treat the pod running the Ray Head node as a pet. Now, we can restart it whenever we need or want, without impacting the workloads. This is all thanks to storing its GCS state in Redis. Additionally, RayService supports exposing applications through the serve K8s Service. This service targets the RayCluster’s workers (pods) that run the applications and allows you to exclude the Ray Head node (pod). Consequently, we no longer experience downtime when a Ray Head node (pod) dies because our applications are no longer dependent on a single point of exposure.
Did we just move the single point of failure?
One might argue that when it comes to restarting our Ray Serve applications, we have simply moved the single point of failure from the Ray Head node (pod) to Redis. However, the reality is different. Our Redis stores the GCS state in a PersistentVolume (PV). Thus, we can tolerate restarts of both the Ray Head node (pod) and a Redis pod, as long as they come up within a reasonable timeframe. The timeframe for the Ray Head node (pod) to come up is longer than the timeframe for the Redis pod, because while the Ray Head node (pod) is recovering, your applications can still handle traffic with Ray Worker nodes (pods). The only downside is that the RayCluster can’t update or recover from some failures (e.g., Ray Actor or crashes of Ray Worker nodes) without the Ray Head node (pod) being healthy. On the other hand, if a Redis pod running as an external GCS is down for longer than 60 seconds (default), the Ray Worker nodes (pods) will fail too many raylet heartbeats and eventually restart. At this point, you are in big trouble because you have an outage.
High availability with Dragonfly
To mitigate these issues, we have deployed the external GCS in highly available mode (HA) using Dragonfly and increased the scheduling priority of both the Ray Head node (pod) and the Dragonfly pods to ensure K8s always finds a place to run them. While Redis is the external GCS most often referenced in the Ray documentation, it comes with limitations for high availability. Specifically, Ray doesn’t support Redis Sentinel or Redis Cluster. To address this, we chose a different in-memory data store called Dragonfly. Dragonfly is a fully Redis API-compatible alternative that copes more natively with Ray. You can see a high-level architecture of this solution in the picture below.
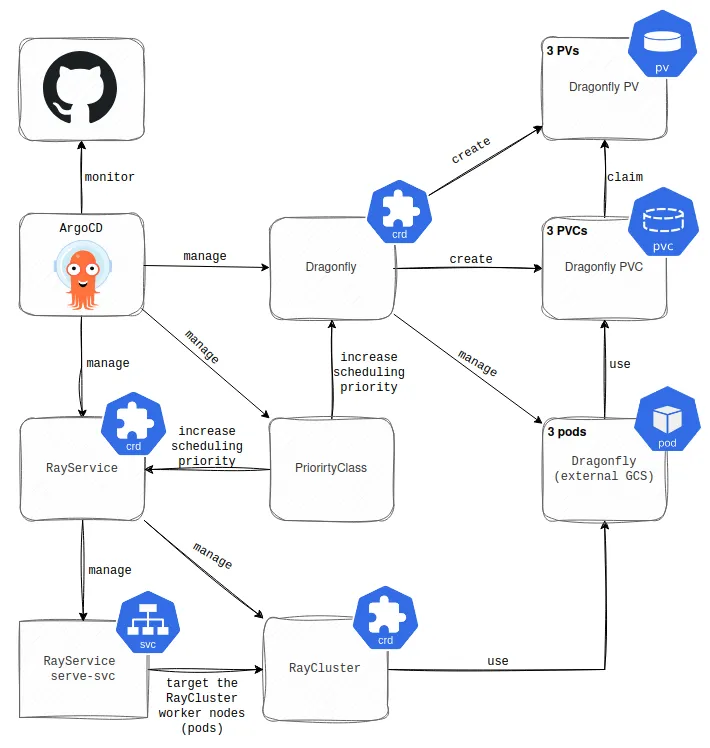
Note: For the simplicity of the diagram, the components of the HA Dragonfly are displayed in separate boxes. The “(3 instances)” label in each box clarifies that these resources represent three identical instances in the production environment.
Fixing autoscaling and slimming down with custom images
Another cherry on top was the fix of autoscaling, specifically the downscaling of the RayCluster nodes noted in the previous parts. However, this was thanks to the upgrade of the RayCluster version to 2.47+, thanks to this PR. Speaking of autoscaling, this is also where our move to the custom Docker images comes in. The main motivation was the slow start-up of the RayCluster’s worker nodes (pods). The slow start affects more than just the upscaling. It also lengthens the recovery time whenever a Ray Worker node (pod) restarts. As we mentioned earlier, we used to install the application dependencies using the container’s args. Unsurprisingly, this slowed down the start of the pods. To address it, we moved the installations to Dockerfiles. However, the size of the images presents the next area for optimization. The default Ray images are quite large. The GPU one in particular is around 12GB. In comparison, the image used for the Ray CPU workers and the Ray Head node is relatively small, even though it still has around 2.5GB. In addition to the default images, we also need to install our dependencies, resulting in the final size of the images being exceptionally large.
Wrapping up
That should cover everything about the migration from the RayCluster CRD to the RayService CRD. If you’re interested in some other challenges we faced and improvements we made to enhance the system since the second blog post in this series, check out the next part.
